This chapter contains the following topics:
A job must be described to the system before costs can be accumulated for it, and this is done by the Job description selection. This lets you define the job (and its sub-jobs if any), and later change or even (within restrictions) delete it. The selection also lets you define change orders.
Jobs entered here are usually new jobs. However, when you are initially setting up the Job Cost module, you can enter existing in-progress jobs.
There are six important sections in this process of setting up and running Job Cost software.
Jobs
To set up a job, you must enter some basic information about it. This information includes the number you assign to the job, the job title, and the price of the job.
Cost items for jobs
Set up the job’s cost items, which provide a detailed breakdown of the job into its specific parts. Each part must have an estimated (or budgeted) cost, and the sum of all the estimated costs must equal the price of the job. Remember to enter separate cost items for profit and for overhead, so that the sum of the estimates for the cost items equals the job price.
Copy jobs
Use this option to copy old jobs, that are similar to the new one you want to produce, instead of creating a new job from scratch. You can then make the necessary changes for your new job.
Print jobs list
This selection lets you print a list of the jobs you have on file, in either summary or detailed format.
Activate jobs
Before Job Cost lets you enter actual costs and billings for a job, you must select Activate jobs to give the job an Active status. This selection also checks the consistency of the information you entered before changing the status to active. If a problem is found, the reasons are printed on a Job Activation Report, and the job is not activated.
Print job change log
This feature is optional and displays only if you chose (in Control information) to use the Change Log feature.
A change log is an audit trail of the historical changes you have made to your jobs—not just change orders, but any changes made via the Jobs selection.
Some of the information you enter here depends on the options chosen in Control information when Job Cost was initially set up. Refer to the J/C Control Information Options section in the Getting Started chapter for an explanation of these options and the results of selecting them.
If a field below depends on the change order option being chosen in J/C Control information, the paragraph will be marked (CO). If a field depends on the retainage option being chosen in Control information, the paragraph will be marked (RET). These notations are for your information only. They do not appear on the screen.
Select
Enter from the Job descriptions menu.
This selection is used to enter the most basic descriptive information about a job. You must supply this description before entering any cost item information (which you do via the Cost items selection described later in this chapter).
Despite the name of this selection, it is used to enter sub-jobs and change orders as well as jobs. All three of these will be referred to as entries to avoid cumbersome repetitions of job or sub-job or change order.
Sub-jobs are used when it is desired to break up a large contract into pieces which can be managed separately (and, if desired, billed separately as well). Sub-jobs are often called phases because they occur in succession. For example, in a construction project the excavation phase precedes actual construction. There is no requirement that one sub-job must be finished before billing or costing can apply to the next sub-job.
| • | A job must already exist before its sub-jobs can be defined. |
| • | If a job has sub-jobs, then cost items can be entered only for individual sub-jobs, not for the job as a whole. |
Change orders are used when it is desired to alter the terms of the original contract, resulting in different costs and prices.
| • | A change order can apply only to an existing job or sub-job. |
| • | A change order can apply to a job only if it has no sub-jobs, otherwise it must apply to a specified sub-job. If the change affects more than one sub-job, a separate change order must be entered for each one. |
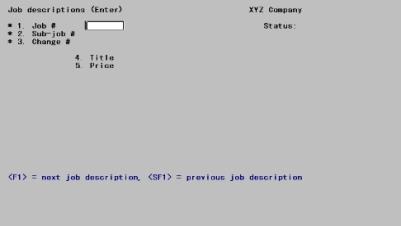
The screen layout varies depending on whether the entry is for a job, a sub-job, or a change order. The upper portion of the screen is the same in all three cases, and so this portion is all that is displayed after you have selected Jobs (or Enter, if using menu bar):
From this screen you can work with both new and existing entries. When working with existing entries, a full audit trail of your changes is preserved provided you have chosen the change log feature (in Control information).
You can use the function keys to scan through the records and examine existing entries. In that case the remainder of the screen will fill out and display the appropriate information for that entry, whether it is a job, a sub-job, or a change order. The cursor will be positioned at Field number to change ? to allow maintenance of the entry (or further scanning).
| • | You can enter the number of a new or existing job. The cursor will then move in succession to the sub-job and change number fields (Fields #2 & 3). |
| • | For the sub-job field: Enter either the desired sub-job number, or enter Blank if you wish to access the job (rather than one of its sub-jobs). |
| • | For the change order field: Enter either the desired number, or enter Blank if you wish to access the original job or sub-job (rather than a change order). |
| • | If you are not using change orders (at all), or if you are not using sub-jobs (for this existing job), then the cursor does not move to the corresponding field. |
Only after you have entered all three fields (or as many of them as are applicable) does the system regard the entry as being identified. It then fills out the remainder of the screen in the format appropriate for a job, sub-job, or change order. At that point:
| • | If the entry is already on file, its information will display and the cursor will be positioned at Field number to change ? to allow maintenance of the entry. |
| • | Otherwise, the cursor will be positioned at Field #4 to allow entry of the remainder of this new entry. |
| • | There is one exception: For a closed job, entering the job number displays at once the information on file for that job. You do not get the chance to enter a sub-job or change order number. You can however view these from Field number to change ? (but only by using the function keys). |
Enter the following information:
1. Job #
Options
Enter the job number, or use one of the options:
|
<F1> |
For the next entry on file |
|
<SF1> |
For the previous entry |
|
Format |
Up to 7 numbers |
|
Example |
Type 602 |
2. Sub-job #
If this job uses sub-jobs, enter the sub-job number, or else enter Blank to indicate that you wish to reference the job itself and not its sub-jobs.
If this is an existing job with no sub-jobs, the field remains blank and the cursor does not move to it.
|
Format |
999 |
|
Example |
[The cursor does not move to this field because this is a new job.] |
3. Change #
If you have chosen (in Control information) not to use change orders, this field displays as (Not applicable) and the cursor does not move to it.
If this entry is not for an existing job, the cursor skips this field and it cannot be changed. A job must be entered before it can have change orders.
Enter the change order number, or else enter Blank to indicate that you wish to reference the original job (or sub-job).
You will probably want to assign change order numbers sequentially; however, the system does not enforce this rule and does not even require successive changes to be in ascending order.
|
Format |
999 |
|
Example |
[In this example the cursor does not move to this field because this is a new job.] |
4. Title
Enter the title for a new job, sub-job, or change order here. You do not need to abbreviate much. You will later be able to enter a considerable amount of Additional Description for each entry. You can even leave the title blank.
|
Format |
25 letters |
|
Example |
Type Storage Warehouse |
5. Price
Enter the agreed-upon price of the job or sub-job here.
This will normally be a positive number. Zero and negative amounts are nonetheless allowed because for change orders the amount entered here is interpreted as an adjustment to the original.
The price of a job must include any profit and overhead that apply to the job. It should equal the total of the prices of all the sub-jobs of the job. It should not include the prices of any change orders.
|
Format |
999,999,999- |
|
Example |
Type 85896 |
6. Date (CO)
This field displays for a change order. Enter the date. If the change order is not yet approved, you can leave this field blank.
This date is informational only. A date in the future does not prevent billings, costs, or payments from applying to this change order.
|
Format |
MMDDYY or Blank. The default is Blank. |
|
Example |
[Does not occur in this example because this is not a change order.] |
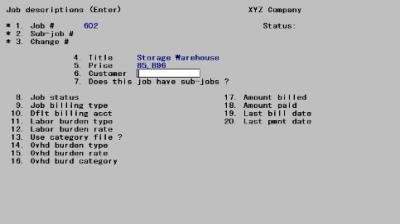
6. Customer (number and name)
Enter the customer number and name for this job. You must enter a customer number. The name is optional.
If you are interfaced to A/R
If you want to use the customer’s number as it appears in A/R Customer information, <F8> is available for the purpose. The customer name must still be entered manually. Using a number not on Customers does not cause any problem interfacing to A/R, since A/R recognizes jobs by job number without checking the customer number.
|
Format |
12 characters for customer number 25 characters for customer name |
|
Example |
Type MARIN Type Brickyards |
7. Does this job have sub-jobs ?
If you are going to break this job down into sub-jobs, answer this question Y. You must then make a separate entry for each sub-job (but first finish this job entry).
If the job will not be broken down into sub-jobs, answer N.
You cannot change this answer once the job description is entered.
|
Format |
One letter, either Y or N. The default is Y. |
|
Example |
Type N |
Bill for the sub-jobs ?
This question displays only if you answered Y to the previous question.
If you will be billing the customer for each sub-job individually, answer Y; otherwise, answer N.
|
Format |
One letter, either Y or N. The default is Y. |
|
Example |
[Does not occur in this example because you responded N to the preceding.] |
8. Job status
Each job is assigned a status, which indicates the condition of the job. For example, when entering a new job you would give it a status of new.
Options
Jobs can be assigned the following statuses:
|
N |
New. Use this status when entering a new job for which work has not yet started. When entering a job with status new, you will not be asked to enter any accumulated costs or billing amounts. These amounts are automatically set to zero since you cannot have accumulated any costs or billings for a job which has not yet started. |
|
I |
In progress. Use this status when entering a job for which work has already started. When entering a job with status in-progress, you will be asked to enter all accumulated costs and billing amounts for the job. These amounts must be entered for the job or else the various Job Cost reports will not be accurate for this job since you have not given the software sufficient information. |
|
O |
Copy only. Use this status for jobs, which are used only to create other jobs. Such jobs are templates (models) which can be used to reduce data entry if your company does a lot of jobs, which are similar. The selection Copy jobs is used to make a copy of a copy only job. |
Job statuses that are automatically assigned are:
|
A |
Active. A job must be activated before it can be run. Activation is a process, which verifies certain information about the job, and is discussed later in this chapter. You cannot enter this status directly on the Job description screen. It is assigned to a job only when you run the Activate jobs selection. Only new, in-progress or unreconciled (described next) jobs may be activated. |
|
U |
Unreconciled. After a job is activated there are certain actions which result in the software assigning the job the status unreconciled. For example, if you add a sub-job to the job, then the job is assigned the status unreconciled. An unreconciled job must be activated again using Activate jobs before it can be run again. This is required so that the software can re-verify certain critical information about the job. |
|
C |
Closed. A job is assigned the status closed, using the selection Close or re-open jobs, when no more costs are expected to be incurred for the job. Once a job is closed, you may no longer post any costs to the job. However, billings may still be posted to the job. Only active jobs can be closed. A closed job may be re-opened, in which case its status becomes active as described above. Refer to the Utility chapter for further discussion of closing and re-opening jobs. |
If a job has sub-jobs, all the sub-jobs share the status of the main job. You cannot for instance close the excavation phase of a job and leave the construction phase active.
Of the above statuses, the only ones that can be entered directly on the job description screen are New, In-Progress, or Copy only.
|
Format |
One letter from the list above, either N, I, or O. There is no default. |
|
Example |
Type N |
9. Job billing type
There are two billing types you can choose for any job: fixed-fee or cost-plus.
| • | With fixed-fee, the customer pays a fixed price, no matter how much it costs the contractor. |
| • | With cost-plus, the customer pays the costs plus an additional profit amount. |
Options
Enter either:
|
F |
Fixed-fee |
|
P |
Cost-plus |
Upon entry of a valid code, it is spelled out on the screen.
|
Format |
One letter from the two above. The default is F. |
|
Example |
Type P |
10. Dflt billing acct
Options
When you enter a billing for a job, you must enter a billing account number. What you enter here is the default account used for such billings. Enter a valid account number, or use the option:
|
<F2> |
For the default billing account from Control information |
|
Format |
Your standard account number format, defined in Company information |
|
Example |
Press <F2> to accept the default. |
11. Labor burden type
Use this field only if you are interfacing with the Passport Business Solutions Payroll. If not, it displays as (Not applicable) and the cursor does not move to it.
Options
Otherwise, this determines how you want to calculate the labor burden. For more information, refer to the J/C Control Information Options section in the Getting Started chapter. Enter one of the following:
|
L |
Percentage of labor cost. |
|
R |
Rate per labor hour. |
|
Blank |
There is no labor burden for this job. |
|
Format |
One character from the list above. The default is whatever you have previously entered in Control information. If you followed the example there, it is Blank. |
|
Example |
Press <Enter> to accept the default. |
12. Labor burden rate
Use this field only if you are interfacing with the Passport Business Solutions Payroll and you have entered a non blank value in Field #11. Otherwise, it displays as (Not applicable) and the cursor does not move to it.
Options
This is the rate or percentage that goes along with the labor burden type entered above. If the labor burden type is a percentage of labor cost, enter that percentage here. If the labor burden type is a rate per labor hour, enter that rate here, or use the option:
|
<F2> |
For the default rate from Control information. |
|
Format |
999.999 (If a percentage) 999.999 (If a rate) |
|
Example |
[This field is skipped because you left the preceding field blank.] |
13. Use category file ?
If you specified in Control information that Categories are not to be used for any jobs, this field displays as (Not applicable) and the cursor does not move to it. Otherwise:
| • | Answer Y if the cost items for the job are to be validated against Categories. The category number for each cost item entered for this job must previously have been defined via Categories. |
| • | Answer N to allow non-standard categories (those not on file) for this job. You will have to enter the category’s description each time you reference it. |
|
Note |
Once you press <Enter> at Field number to change ?, you will not be able to change the answer for this field. The only way to change the field is to delete the job and then enter the Job Description record again, setting this field to the answer you want. So, be sure it is correct the first time. |
|
Format |
One letter, either Y or N. The default is Y. |
|
Example |
Type Y |
14. Ovhd burden type
This determines how you want to calculate the overhead burden. For more information, refer to the J/C Control Information Options section in the Getting Started chapter.
Options
Enter one of the following:
|
J |
Percent of job cost |
|
L |
Percent of labor cost |
|
R |
Rate per labor hour |
|
Blank |
There is no overhead burden for this job |
|
Format |
One character from the list above. The default is whatever you have previously entered in Control information. If you followed the example there, it is J. |
|
Example |
Type L |
15. Ovhd burden rate
If you entered Blank in the preceding field, this field displays as (Not applicable) and the cursor does not move to it.
Otherwise, this is the rate or percentage that goes along with the overhead burden type entered above.
| • | If the overhead burden type is a percentage of job cost or a percentage of labor cost, enter that percentage here. |
| • | If the overhead burden type is a rate per labor hour, enter the rate here. |
Options
You can also use the option:
|
<F2> |
For the default rate or percentage from Control information |
|
Format |
999.999 |
|
Example |
Press <F2> to accept the default. |
16. Ovhd burd category
If you entered Blank in Field #14, this field displays as (Not applicable) and the cursor does not move to it.
Otherwise, enter the number of the cost category into which this burden will be accumulated.
| • | If you are using Cost Categories, this category must previously have been entered (in Categories), defined as a non-direct cost type. |
| • | If you are not using Cost Categories for this job, you must subsequently define a cost item for this job (in Cost items for jobs) with this category number and with a non-direct cost type. Failure to do so will prevent the job from being activated. |
For information about direct and non-direct cost types, refer to the J/C Control Information Options section in the Getting Started chapter.
Options
You can also use the option:
|
<F2> |
For the default cost category from Control information |
|
Format |
9,999,999 |
|
Example |
Press <F2> to accept the default. |
|
Note |
Fields #17, 18, 19, 20, 22, and 23 below are all automatically maintained by the system. The cursor does not move to them and they cannot be changed from Field number to change ?. They appear on the screen primarily for your information. There is one exception: When entering an in-progress job, which normally happens only upon installation of the J/C module, you are allowed to enter the current value of these fields. |
17. Amount billed
This is the amount billed to date for this entry. Refer to the Note above.
|
Format |
999,999,999.99- |
|
Example |
[Skipped because this is not an in-progress job] |
18. Amount paid
This is the amount paid to date. Refer to the Note prior to Field #17.
|
Format |
999,999,999.99- |
|
Example |
[Skipped because this is not an in-progress job] |
19. Last bill date
This is the date of your most recent billing. Refer to the Note prior to Field #17.
|
Format |
MMDDYY, or blank if not billed yet. |
|
Example |
[Skipped because this is not an in-progress job] |
20. Last pmnt date
This is the posting date of the most recent payment. Refer to the Note prior to Field #17.
|
Format |
MMDDYY, or blank if no payment received yet. |
|
Example |
[Skipped because this is not an in-progress job] |
|
Note |
If you have chosen (in Control information) not to use retainage receivable, Fields #21, 22, and 23 do not appear on the screen at all. Proceed to Field number to change ?. |
21. Retnge percent (RET)
Refer to the notes prior to Field #17 and Field #21.
Options
Enter any retainage percentage here, or use the option:
|
<F2> |
For the default retainage percent from Control information |
|
Format |
99.9 |
|
Example |
Press <F2> to accept the default. |
22. Retnge billed (RET)
Refer to the notes prior to Field #17 and Field #21.
Retainage amount billed is normally calculated automatically.
|
Format |
999,999,999.99- |
|
Example |
[Skipped because this is not an in-progress job] |
23. Retnge paid (RET)
Refer to the notes prior to Field #17 and Field #21.
Retainage amount Paid is normally calculated automatically.
|
Format |
999,999,999.99- |
|
Example |
[Skipped because this is not an in-progress job] |
Field number to change ?
The screen will now look like this:
Options
Make any desired changes. If this is an existing entry, you can also use one of the options:
|
<F1> |
For the next entry |
|
<SF1> |
For the previous entry |
|
<F3> |
To delete this entry—but see below for restrictions |
Deleting a job, sub-job, or change order
When a job is in the status of new, in-progress, or copy-only, you can delete it at will because such a job cannot have accumulated any costs or payments. You must first confirm that you want to delete the entire job, including all its’ sub-jobs, change orders, and cost items.
When a job has gotten beyond that point and is in the active, unreconciled, or closed status, it can be removed from the system only by being purged. Active and unreconciled jobs must be closed before they can be purged. The Utility chapter describes these processes. Passport assigns very specific meanings to the terms closing, deleting, and purging. They are not synonyms of one another.
A sub-job or a change order can be deleted from a job, provided there are no transactions for it (posted or unposted).
| • | If the job is active or unreconciled, you must first delete each of the cost items for the sub-job / change order. This in turn causes the job (if active) to become unreconciled, requiring you to reactivate it. |
| • | Otherwise, deleting the sub-job / change order automatically deletes the associated cost items. |
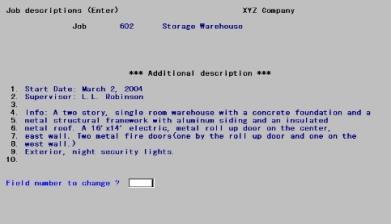
Do you wish to add additional description ?
This question displays upon pressing <Enter> from a blank Field number to change ?.
Answer N to return to the first screen for the next entry, or Y to enter additional description.
|
Format |
One letter, either Y or N. The default is N. |
|
Example |
Type Y |
Upon typing Y, the following screen displays:
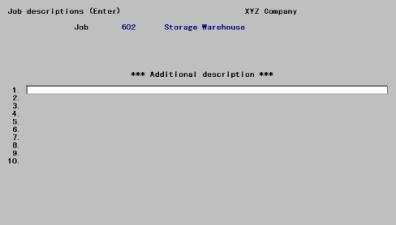
You can enter any additional information you want to record about this job, sub-job, or change order. The identification of the entry displays at the top and will vary depending upon what type of entry it is.
Blank lines take up no space on disk—only lines with characters require storage space.
Data entry into this screen does not follow the format of the familiar <F6> notes. There is no wraparound from line to line, and the cursor control keys are not active. A line can not be inserted between existing lines, nor do lines close up to fill the gap whenever an existing line is blanked out.
For existing Additional Description
The cursor is positioned at Field number to change ?, and only one line can be changed at a time. You can change a line even though it is blank.
Press <Enter> at the end of each line entered, or at the beginning of the line to obtain a blank line.
Options
Enter the number of the line to change, or use the option:
|
<F3> |
To delete all Additional Description for this entry |
Press <Enter> from a blank Field number to change ? to return to the previous screen.
For new Additional Description
The cursor is positioned on the first character of Line #1 to allow data entry.
Press <Enter> at the end of each line to proceed to the next line, or at the beginning of a line to leave that line blank.
Press <Esc> from any line to terminate entry of additional description. This takes you to Field number to change ?.
| • | Any text already entered on the current line will be lost. Since this is not usually what you want, to terminate additional description you should get into the habit of pressing <Enter>, then <Esc>. |
| • | When already on the tenth line, pressing <Enter> by itself takes you to Field number to change ?. |
| • | From Field number to change ? you can correct individual lines by line number, or continue processing by pressing <Enter> with this field blank. This does not return you to the previous screen but takes you to the next (that is, you arrive at the same point you would have reached had you answered N to the question Do you wish to add additional description ?).z |
|
Format |
10 lines of 75 characters each |
|
Example |
Enter the additional description from the following screen |
Change orders (CO)
Follow these steps to enter a change order for an existing, active job:
| • | Add the change order. |
If the job uses sub-jobs, enter a separate change order for each affected sub-job (preferably using the same change order number for each).
For the price of the change order, enter the price adjustment due for this change order. If the change order reduces the job price, enter the price as negative. Do not change the price on the job or sub-job because of this change order.
| • | Enter the cost items for the change order (using Cost items for jobs). The sum of the budgeted costs for these cost items must equal the price of the change order (some of these budgeted costs could be negative). |
| • | Restore the job to active status by using Activate jobs, described later in this chapter. |
| • | If you merely wish to correct a keying error in an existing job, you do not need a change order. You can simply modify the appropriate field of the original job. If the job is still new no further action is needed, but if it has already been activated you may have to activate it again. |
Once a job description has been created for a job (or sub-job, or change order) via the previous selection, use this selection to enter the specific cost items which exactly describe the work that will go into this job.
Select
Cost items for jobs from the J/C menu.
The following screen displays:
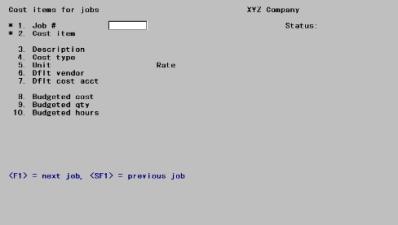
From this screen you can work with both new and existing cost items. If a cost item already exists with the job and cost item number you specify, that cost item will appear and be available for changes or deletion.
1. Job #
Enter the number of the job for which you are entering the cost item.
The job must already exist and cannot be a closed job. You cannot use this selection for closed jobs, not even to examine their cost items (use View \ Jobs \ Cost items for this purpose).
Options
You can also use one of the options:
|
<F1> |
For the next job |
|
<SF1> |
For the previous job |
|
Format |
7 characters |
|
Example |
Type 602 |
Upon selection of a valid job, its description and status display to its right.
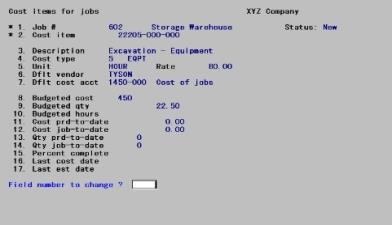
2. Cost item
If this is for a change order, the category of the cost item need not duplicate that of a cost item already exist for this job (or sub-job). It is legitimate for a change order to add a new category to a job.
Enter the complete designation of this cost item, in segments:
|
Format |
Up to 7 characters Cost category. If this job uses Cost Categories, this category number must already have been defined via the Categories selection. 9999999 and 9999998 are reserved cost category numbers and cannot be used. 999 Sub-job number. If this job has sub-jobs, this must be an existing sub-job for that job. If not, this segment is automatically set to zero and you cannot enter anything into it. 999 Change order number. This must either be the number of a change order already defined for this job, or Blank if the cost item is not for a change order. If you have chosen (in Control information) not to use change orders, this segment is not present and the cursor does not move to it. |
|
Example |
Type 22205 Press <Enter> again for 000 Press <Enter> again for 000 |
3. Description
This is requested only if you are not using Cost Categories for this job. Otherwise, it is displayed automatically and the cursor does not move to this field.
|
Format |
Up to 25 letters |
|
Example |
[In this example this field displays automatically because you are using Cost Categories.] |
4. Cost type
If this job uses Cost Categories, the cost type associated with this category, displays here and cannot be changed. Otherwise, enter a cost type for this job. Your choices, displayed at the bottom of the screen, include:
| • | The predefined cost types. |
| • | Your user-defined cost types, from Control information. |
| • | Cost type 91, for GROUP. This choice allows you to group cost items as desired for this job only. Notice that if the job does use Cost Categories, the items have already been grouped (by you) as desired. |
|
Format |
99 |
|
Example |
[In this example this field displays automatically because you are using Cost Categories.] |
Upon entry of a valid cost type, its name displays next to its abbreviation. In addition, the format of the lower portion of the screen may change at this point. This is because some of the fields still to be described apply only to some cost types and not to others.
If you do not use Cost Categories, it is possible to define cost items which have the same category number but different cost types (within different sub-jobs or change orders of the same job). You should avoid doing this.
End group #
This field displays only if you have entered 91 in the previous field. It allows you to define a group of categories for costing purposes. This group begins at the category number entered in Segment #2 of Field #2, and ends at the group number you are about to enter here.
|
Format |
9999999 |
|
Example |
[Does not occur in this example because you are using Cost Categories.] |
A cost item group does not accumulate costs itself since its costs represent the summation of every cost item in the group. The remaining fields on the screen are therefore irrelevant for this purpose, so the cursor moves to Field number to change ? as soon as you have entered the End group #. You can still enter a separate cost item for each member cost item of the group.
For more information about categories, refer to the How to Group Your Cost Categories section in the introduction to the Categories chapter.
5.Unit
If you are using Cost Categories, this is automatically set to the unit for the cost category, and you will not be able to change it. If you are not using Cost Categories, you can enter it here if it is applicable.
Enter the unit of work or material associated with this cost item. For example, it could be CUYD (for cubic yards of dirt excavated) or SQFT (for square feet of plywood used). It is never labor hours, since hours are always tracked separately for all labor type cost items.
This is not a required field, but you can use it to keep track of quantities on some cost items where this would be desirable. If left blank, it displays as NONE. Some of the following fields are not applicable when there is no unit. These situations will be noted as they occur.
|
Format |
4 letters |
|
Example |
[In this example this field displays automatically because you are using Cost Categories.] |
Rate
Options
Enter the rate (dollar amount) for the unit. If no unit is associated with this cost item, the cursor will not move to the rate field and it will be left blank. Otherwise, you can enter a rate, or leave it blank. If you are using Cost Categories you can also use the option:
|
<F2> |
For the default rate from Cost Categories |
|
Format |
99,999.999 |
|
Example |
Press <F2> to accept the default. |
6. Dflt vendor
It this is a labor cost type or a non-direct cost type, the cursor does not move to this field and nothing can be entered into it.
Otherwise, enter the number of the vendor associated with this cost item for this job, if available. If there is not one, leave this blank. The default vendor is used when entering costs for this cost item.
Options
If you are using Cost Categories, and if there is a default on file for this category, you can also use the option:
|
<F2> |
For the default vendor number in Cost Categories |
If you are interfaced to A/P
You will probably want to use the vendor’s number as it appears in A/P Vendors, and <F8> is available for the purpose. Using a number not in Vendors does not cause any problem interfacing to A/P, since A/P Payables recognizes jobs by job number without checking the vendor number.
|
Format |
6 letters |
|
Example |
Type TYSON |
RET-%
This field is not applicable if:
| • | You have specified (in Control information) that you do not use retainage payable, or |
| • | This is a labor or non-direct cost item. |
Any retainage percent you enter here is used as the default to calculate the retainage amount when you are entering cost entries for this cost item. You can override it when entering any costs.
Options
Enter the usual retainage percentage that you will hold back from the vendor for this cost item, or leave the field blank. If you are using Cost Categories, and if there is a default on file for this category, you can also use the option:
|
<F2> |
For the default retainage percentage in Cost Categories |
|
Format |
99.9. The default is zero. |
|
Example |
Press <Enter> to default to.0 |
7. Dflt cost acct
If the cost type for this cost category is not a direct cost type, this field displays as (Not applicable) and cannot be entered. This would be the case for Profit or Overhead, to give two examples.
Options
Otherwise, enter the default cost account to be used when entering costs for this cost item, or use the option:
|
<F2> |
For the default cost account from Control information |
|
Format |
Your standard account number format, as defined in Company information. |
|
Example |
Press <F2> for the default. |
8. Budgeted cost
Enter the cost that you have estimated will be incurred for this item for this job. If this is a non-direct cost type, such as profit or overhead, you must still enter the estimate for this cost item.
|
Format |
999,999,999- |
|
Example |
Type 450 |
9. Budgeted qty
If no unit displays in Field #5, quantity is meaningless—the cursor does not move to this field, which is then left blank.
Otherwise, enter the estimated quantity, which you expect to use or accomplish for this cost item for this job, in terms of the same units entered in Field #5.
|
Format |
99,999,999.9- |
|
Example |
Type 22.5 |
10. Budgeted hours
This field applies only to labor. If the cost item type is anything else, the cursor does not move to this field and it is left blank.
Otherwise, enter the number of labor hours you expect to use for this cost item.
|
Format |
999,999.99- |
|
Example |
[Skipped in this example because this is not a labor cost type.] |
Cost fields
The remaining fields on the screen represent information, which is updated automatically as costs are entered and posted. These fields therefore display only for in-progress jobs (status I). In add mode they can be entered directly. In change mode, they are a protected change.
Depending on the cost item and on your Control information choices, not all these fields may appear on the screen and not all those that do can be entered. These cases will be described as they occur.
11. Cost prd-to-date
Enter the cost already incurred for this cost item for this job for the current period.
|
Format |
999,999,999.99- |
|
Example |
[Not entered in this example because this is not an in-progress job.] |
12. Cost job-to-date
Enter the cost already incurred for this cost item for this job since the beginning of the job.
|
Format |
999,999,999.99- |
|
Example |
[Not entered in this example because this is not an in-progress job.] |
13. Qty prd-to-date
If there are units of work or material associated with this cost item, enter the number of units already completed or used for this cost item in the current period.
|
Format |
99,999,999.99- |
|
Example |
[Not entered in this example because this is not an in-progress job.] |
14. Qty job-to-date
If there are units associated with this cost item, enter the number of units of work or material already completed or used for this cost item since the beginning of the job.
|
Format |
99,999,999.99- |
|
Example |
[Not entered in this example because this is not an in-progress job.] |
15. Percent complete
Enter the percentage of the cost item that has been completed.
|
Format |
999 (within the range 0 through 100) |
|
Example |
[Not entered in this example because this is not an in-progress job.] |
16. Last cost date
Enter the date of the last cost entered for this cost item. This field is updated automatically when job costs are posted, and is blank if no such posting has occurred yet.
|
Format |
MMDDYY or blank |
|
Example |
[Not entered in this example because this is not an in-progress job.] |
17. Last est date
Enter the date that the last completion estimate was made for this cost item. This field is updated automatically when completion estimates are posted, and is blank if no such posting has occurred yet.
|
Format |
MMDDYY or blank |
|
Example |
[Not entered in this example because this is not an in-progress job.] |
Labor cost items
If this is not a labor cost item, you are finished entering information. Proceed to Field number to change ?.
If this is a labor cost item, you will be requested to enter the fields below. Note that labor cost fields are updated automatically as Payroll costs are interfaced to Job Cost. If you are not interfacing the Passport Business Solutions Payroll into Job Cost, you will be requested to enter only information for Fields #18 and 19 (there will be no breakdown into regular, premium, and burden).
18. Regular hrs PTD
Enter the number of regular labor hours already spent on this cost item in the current period.
|
Format |
999,999.9- |
|
Example |
[Not entered in this example because this is not an in-progress job.] |
19. Regular hrs JTD
Enter the number of regular hours already spent on this cost item since the beginning of the job.
|
Format |
999,999.9- |
|
Example |
[Not entered in this example because this is not an in-progress job.] |
20. Regular cost PTD
Enter the direct wage cost of the regular labor hours spent on this cost item in the current period.
|
Format |
999,999,999.99- |
|
Example |
[Not entered in this example because this is not an in-progress job.] |
21. Regular cost JTD
Enter the direct wage cost of the regular labor hours spent on this cost item since the beginning of the job.
|
Format |
999,999,999.99- |
|
Example |
[Not entered in this example because this is not an in-progress job.] |
22. Premium hrs PTD
Enter the number of overtime and double-time hours already spent on this cost item in the current period.
|
Format |
999,999.9- |
|
Example |
[Not entered in this example because this is not an in-progress job.] |
23. Premium hrs JTD
Enter the number of overtime and double-time hours already spent on this cost item since the beginning of the job.
|
Format |
999,999.9- |
|
Example |
[Not entered in this example because this is not an in-progress job.] |
24. Premium cost PTD
Enter the direct wage cost of the premium labor hours spent on this cost item in the current period.
|
Format |
999,999,999.99- |
|
Example |
[Not entered in this example because this is not an in-progress job.] |
25. Premium cost JTD
Enter the direct wage cost of the premium labor hours spent on this cost item since the beginning of the job.
|
Format |
999,999,999.99- |
|
Example |
[Not entered in this example because this is not an in-progress job.] |
26. Labor burden PTD
Enter the amount of labor burden cost, in addition to direct wages, that has been automatically calculated for this cost item in the current period (it is not included in the Cost period-to-date field above).
|
Format |
999,999,999.99- |
|
Example |
[Not entered in this example because this is not an in-progress job.] |
27. Labor burden JTD
Enter the amount of labor burden cost, in addition to direct wages, that has been automatically calculated for this cost item, since the beginning of the job (it is not included in the Cost job-to-date field above).
When you finish entering the contents of these fields, you have the option of entering an additional description for the cost item.
|
Format |
999,999,999.99- |
|
Example |
[Not entered in this example because this is not an in-progress job.] |
Field number to change ?
If you have been following the examples the screen will now appear thus:
Make any needed changes. If this is an existing entry, you can also use one of the options:
|
<F1> |
For the next cost item for this job |
|
<SF1> |
For the previous cost item |
|
<F3> |
To delete this cost item. You cannot delete a cost item, which already has costs (even if not posted yet). |
Do you wish to add additional description ?
This question displays when you press <Enter> from a blank Field number to change ?.
Answer N to omit such description, or Y to enter additional description.
|
Format |
One letter, either Y or N. The default is N. |
|
Example |
Type Y |
Upon typing Y the following screen displays:
You can enter any additional information you want to record about the job. What you enter is totally up to you.
The screen heading will vary depending upon whether this entry is for a job, a sub-job, or a change order.
Additional description for cost items is entered exactly as is Additional description for jobs.
|
Format |
10 lines of 75 characters each |
|
Example |
Type If ledge is encountered, customer agrees to pay for jackhammer Press <Enter> then press <Esc> |
This selection allows you to set up a new job very quickly by copying some or all of the cost items from an already existing job. You have a wide range of choices of what exactly you want to copy from the old job to the new job.
You can copy from jobs described as copy only (job status O), which you have created for the purpose. You are not restricted to working from such templates, but you can copy from any actual job regardless of its status.
You must have already entered the job description for the new job before you can use this option to copy cost items to it.
Select
Copy from the Job descriptions menu.
The following screen displays:
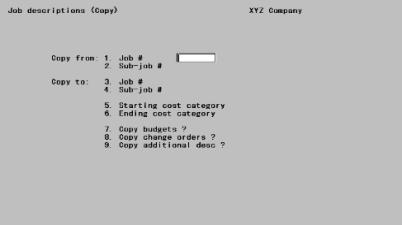
Enter the following information:
1. Copy from job #
Enter the number of the job you are copying cost items from. The job must already exist.
|
Format |
7 characters |
|
Example |
Type 602 |
2. Copy from sub-job #
If the job does not use sub-jobs, this field displays as (Not applicable) and cannot be changed.
Options
Otherwise, enter the number of the sub-job whose cost items you wish to copy, or use the option:
|
<F5> |
To copy from All the sub-jobs of this job |
|
Format |
999 |
|
Example |
[Displays as (Not applicable) in this example] |
3. Copy to job #
Enter the number of the job you are copying to. The job description for this job must have already been entered.
It is legitimate to copy to an active job, but you will first be asked to confirm that you really want to do this since it destroys the existing information in the target job.
|
Format |
7 characters |
|
Example |
Type 603 |
4. Copy to sub-job #
Either both the copy-from job and the copy-to job must use sub-jobs, or else both of them must not use sub-jobs.
If neither job uses sub-jobs, this field displays as (Not applicable) and cannot be changed.
If you are copying from All sub-jobs, this field is automatically set to All and cannot be changed.
Otherwise, enter the number of the sub-job you are copying to. This need not be the same as the source.
|
Format |
999 |
|
Example |
[Displays as (Not applicable) in this example] |
5. Starting cost category and
6. Ending cost category
Enter the range of cost categories you wish to copy. Follow the screen instructions.
|
Format |
9999999 at each field |
|
Example |
Press <F2> at each field for First through Last. |
7. Copy budgets ?
If you wish to copy the budgeted (estimated) amounts and quantities from the old job, answer Y. If you answer N, the budgeted amounts and quantities will be set to zero in the new job and you will have to enter them separately.
|
Format |
One letter, either Y or N. The default is Y. |
|
Example |
Press <Enter> for Y |
8. Copy change orders ? (CO)
If you have decided in Control information not to use change orders, you are asked whether or not you wish to copy all information for change orders (in addition to copying the cost items for the original job).
|
Format |
One letter, either Y or N. The default is Y. |
|
Example |
Press <Enter> for Y |
9. Copy additional desc ?
If you wish to copy the additional description from the old job, answer Y.
|
Format |
One letter, either Y or N. The default is Y. |
|
Example |
Press <Enter> for Y |
Field number to change ?
Make any needed changes. Upon pressing <Enter> with this field blank, there will be a pause for a few moments while the cost items are copied. After you are notified that this process is complete, press <Esc> to return to the menu.
This function allows you to print the job and cost item descriptions entered above. It gives you a variety of choices in printing this information.
Jobs can be printed up until the time they are either purged or saved (described in the Utility chapter). This means that if you use the inactive files/tables you cannot print a job list of what is in them. Use the Job Closing Report, described in the Management Reports chapter, for this purpose.
You may view a Jobs List example in the Sample Reports appendix.
Select
Jobs from the Reports menu.
The following screen displays:
Enter the following:
1. Starting job # and
2. Ending job #
Enter the range of jobs you wish to print. Follow the screen instructions.
It is not required that either job entered be on file, but there must be at least one job on file within the range entered.
|
Format |
7 characters at each field |
|
Example |
Press <F2> at each field for First through Last. |
3. Sub-job
Options
If you are printing more than one job, this selection and the next will automatically be set to All. If you are printing only a single job, enter the number of the sub-job you wish to print, or use the option:
|
<F5> |
To print All sub-jobs for this job |
|
Format |
999 |
|
Example |
[Automatically set to All in this example because you are printing a range of jobs.] |
4. Change order (CO)
If you chose in Control information not to use change orders, this field will be skipped.
If you are printing a range of jobs, or a range of sub-jobs within a single job, this field will automatically be set to All.
Options
Otherwise, enter the number of the change order you wish to show for the job selected, or use the option:]
|
<F5> |
To print All change orders for this job [or sub-job |
|
Format |
999 |
|
Example |
[Automatically set to All in this example because you are printing a range of jobs.] |
5. Starting category and
6. Ending category
Whether you are printing a range of jobs or a single job, you have the option of printing a range of cost categories (or you can print no cost categories, thus showing only the job description for each job).
Options
Enter the range of cost categories you wish to print (follow the screen instructions), or use the option:.
|
<F5> |
To print no cost categories. This option is available only from Field #5. If chosen, Field #6 is skipped |
|
Format |
9999999 at each field |
|
Example |
Press <F2> at each field for First through Last. |
7. Job status
Options
You can show jobs with all job statuses, or only jobs with selected job statuses. You can enter up to three separate job statuses from the list:
|
N |
New |
|
A |
Active |
|
C |
Closed |
|
I |
In-progress |
|
U |
Unreconciled |
|
O |
Copy only |
You can also use the option:.
|
<F5> |
To print All job statuses |
|
Format |
Zero to three letters from the list above, in three subfields. You must press <Enter> after each entry. Pressing <Enter> from a blank subfield terminates entry for this field. |
|
Example |
Press <F5> just once for All job statuses. |
8. Job billing type
Options
Enter the billing type for the jobs you wish to show. Enter either:
|
F |
Shows Fixed-fee |
|
P |
Shows Cost-plus |
You can also use the option:
|
<F5> |
To print All billing types |
|
Format |
One letter from the list above. There is no default. |
|
Example |
Press <F5> for both billing types. |
9. Show costs and quantities ?
If you answer Y, the accumulated costs and quantities are shown for each cost item printed. If you are not printing any cost categories, this field is set to N automatically.
|
Format |
One letter, either Y or N. The default is N. |
|
Example |
Press <Enter> for N |
10. Show additional descriptions ?
If you wish to show additional descriptions that are associated with the jobs, sub-jobs, change orders, and cost items that you are printing, answer Y. Otherwise, answer N.
|
Format |
One letter, either Y or N. The default is N. |
|
Example |
Type Y |
Field number to change ?
Make any needed changes.
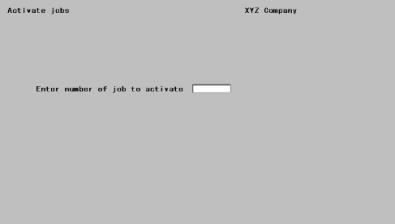
The purpose of this selection is to allow the software to verify certain key information about the job. For example, the software will verify that the sum of the cost items for the job equals the price of the job. If these numbers are not equal, then there is an inconsistency in the setup of your job which must be corrected before any use can be made of the job.
A job can be activated if it is in one of the following statuses:
| • | New |
| • | In-progress |
| • | Unreconciled |
Normally, this selection is used only for a new or in-progress job, and only after you have completed and verified your data entry for the job. There are also certain actions (described later in this section) which can result in an active job being assigned the status unreconciled. In this case, the job must be activated again, using this selection, before transactions can apply against it.
In some cases, a job can be referenced from within other PBS modules before it has been activated, but such transactions cannot be posted to the job until you have activated it. For instance, you can enter a Purchase Order for a job while it is temporarily unreconciled.
What jobs cannot be activated ?
A Copy only job cannot be activated since it is used only as a template to create other jobs.
A Closed job cannot be activated, since it is already an active job, which has been temporarily or permanently closed. You can re-open such a job if desired, using Close or re-open jobs, as described in the Utility chapter.
When does a job need to be reactivated ?
These are the actions that change an Active job to an Unreconciled job (status = U):
| • | Adding or deleting a cost item |
| • | Adding a new sub-job |
| • | Adding a change order |
| • | Changing the price of the job, a sub-job, or a change order |
| • | Changing the budgeted cost of any cost item |
| • | Changing the overhead burden category number. |
What errors does activation look for ?
Activate jobs examines these points:
| • | If a job uses sub-jobs, the sum of the budgeted costs for all cost items in each sub-job must equal the price of that sub-job. |
| • | If the job does not use sub-jobs, the sum of the budgeted costs for all cost items for the job must equal the price of the job. |
Neither of these include change orders, which are checked separately.
| • | For every change order, the sum of the budgeted costs for all cost items in the change order must equal the price of the change order. |
| • | If the job uses sub-jobs and also bills for them, the sum of the amounts billed or paid for all sub-jobs must equal the amounts billed or paid for the entire job. This also applies to any retainage billed or paid. (This check is made only when you are activating an In-progress job, since this is the only time the condition can occur.) |
| • | If the job uses the automatic overhead burden calculation feature, a cost item must have been entered for that purpose (in each sub-job, if sub-jobs are used). The cost type of that cost item must be non-direct. The system recognizes that cost item by its category number, as you have entered it in the job description. |
Some conditions are allowed by Activate jobs, which you would probably not want to occur in a real production job:
| • | You can accidentally activate a job before you have added its cost items and/or sub-jobs, provided the price is zero. |
| • | If you use change orders but do not use Cost Categories, a cost item on the change order can have a different cost type from the same cost item on the original job. |
| • | A job can consist entirely of direct cost items, or conversely of non-direct cost items. |
Select
Activate jobs from the J/C menu.
The following screen displays:
You may view a Job Activation Report example in the Sample Reports appendix.
Enter the following information:
Enter number of job to activate
Jobs must be activated one by one. Enter the number of the job you wish to activate.
|
Format |
Up to 7 numbers |
|
Example |
Type 602 |
Any change ?
Respond Y to re-enter the screen, or N to activate.
If the job you want to activate is already active, you will be so informed and asked whether you want to proceed anyway (to recheck the job). Respond Y to continue, or N to exit.
The software checks that the job is eligible for activation. This may take a few moments, depending on the size of the job.
| • | If no problems are found, the status of the job becomes active and you are notified that the activation is successful. |
| • | If the activation program finds something wrong, it prints an Activation Report describing the error. The status of the job remains as it was, and you are informed on the screen that the job could not be activated. |
The Activation Report is an audit trail report. It cannot be directed to the screen. Despite its name, the Activation Report is printed only when a job has not been activated.
A list of the possible errors diagnosed on the Activation Report is listed below, together with some suggestions for correcting the problem.
Budgeted amounts of cost items do not equal sub-job price
Compare the price of the sub-job with the total budgeted cost of all cost items for the sub-job. Either the price or one or more budgeted costs have been entered incorrectly, or you have omitted some cost items from the sub-job. You must enter cost items for profit and overhead.
Budgeted amounts of cost items do not equal job price
Compare the price of the job with the total of the budgeted costs of all cost items for the job. Either the price or one or more budgeted costs have been entered incorrectly, or you have omitted some cost items from the job. You must enter cost items for profit and overhead. You can use the Jobs List or the Job Status Report to help you track down the error, or you can use View.
Budgeted amounts of cost items for change order do not equal change order price
Compare the price of the change order with the total budgeted cost of all cost items for the change order. Either the price or one or more budgeted costs have been entered incorrectly, or you have omitted some cost items from the change order.
In order to determine a job’s price from its cost items, enter a job price of $0.0 and then enter the budget amounts for each cost item. Verify that the cost items are correctly budgeted and then activate the job. The total amount of the cost items, as shown on the activation report, can then be entered as the job price.
Activate the job again, and the price will be equal to the sum of the cost items. (A similar procedure can be used when a change order is added to a job, except in this case it would be the price of the change order, which is set to $0.00.)
Total price of all sub-jobs does not equal job price
Look at the price of each sub-job of the job and compare the total to the price of the job. Do this by using View. Then correct the price of either the job as a whole or an individual sub-job (whichever is in error).
The overhead burden cost item was not found
In the job description, you chose to have overhead burden calculated automatically and entered an overhead burden category number. If the job uses sub-jobs, every sub-job must have a cost item with the overhead burden category number. If the job doesn’t use sub-jobs, there must be one cost item for the overhead burden category in the job. Find out where the cost item is missing and add it.
Overhead burden cost item is direct cost type
The cost type for the overhead burden is a direct cost. It must be a non-direct cost. Delete the overhead burden cost item from the job and reenter it with the correct cost type.
Total amounts billed and paid for sub-jobs do not equal corresponding job totals
Print the Jobs List for the job, without cost items. Compare the total amounts billed and paid for all sub-jobs with the amounts billed and paid for the job, as shown on this printout. Use Jobs (or Enter for the menu bar) from the Job descriptions menu to correct the errors.
This selection displays only if you have chosen (in Company information) to use change logs.
Selecting this allows you to print the log of changes that were made to Job Masters.
Select
Job change log from the Reports menu.
You will be informed if no changes have occurred. Otherwise, the following screen displays:
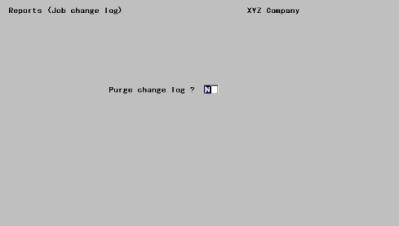
Enter the following information:
Purge change log ?
If you answer Y, all changes are removed from Change Log once the Change Log is printed. If you answer N, these changes will remain on file and will appear on the next report, along with future changes.
|
Format |
One letter, either Y or N. The default is N. |
|
Example |
Press <Enter> for N |
Any change ?
Respond Y to re-enter the screen, or N to print the Change Log. You may be asked to select a printer. If you have chosen to purge the change log, the report cannot be directed to the screen.